
Introduction
Ghost CMS is a amazing platform. It was built to be simple and it is really really fast. One of the problems however is that when you self host it, it may be a bit hard to have a automatic backup system.
With WordPress you could easily setup a backup plugin, but with Ghost we need to be a bit more "hacky".
Doing the initial setup
To get started, the first thing you need to do is to install Rclone.
sudo apt install rcloneAfter that, you will need two things:
- A bash script to backup the files + DB and zip it to a storage cloud
- A external storage.
I will show you the script that I'm using. Feel free to edit it as much as you need. For external storage, I will use pCloud and my personal NextCloud (WebDav).
Rclone supports a LOT of storage services. You can check all of them here.
Getting data
When you installed Ghost, you did it using a different user than root. In the script, make sure to replace "YOURUSER" with your actual user of installation of Ghost.
Also, you will need to get your DB details. You can find it inside the file "config.production.json"
Once you are inside the user and the Ghost files, you can use this command to get the database details
cat config.production.jsonIn my case, I can see this:
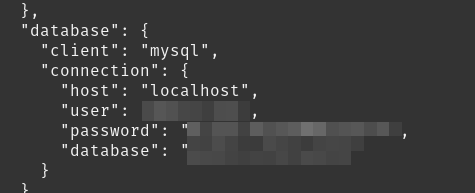
Copy the user, password and database. You will also need to replace it in the script later.
Doing the Rclone setup
Now, before we actually adapt the script to our needs, we need to setup rclone.
The good part is that doing so is easy. Inside your root user, type:
rclone configNow follow these steps:
- Type n to choose a new remote
- Choose a name. I can use "theselfhostingart" for example
- Choose your storage. I will choose 31, for WebDav
- Put the WebDav endpoint url if you choose it too or continue the setup with the
After you are done, you should see this on rclone (of course, you won't see webdav if you choose another option)
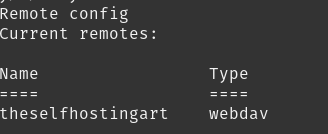
You can safely use "q" to quite rclone now. Time to have fun with the script :)
Creating the bash script
In the script below, replace the following:
YOURUSER -> With your real user, where Ghost is hosted.
DATABASENAME -> With your real database name, the one found on config.production.json.
DBPASSWORD -> With your real DB password.
YOURSITENAME.zip -> With a name that you would like to have at your backup (e.g theselfhostingart.zip)
YOURRCLONENAME -> With the real name of your Rclone connection (e.g theselfhostingart)
PATHHERE -> With the path that you want to use inside. You can use / to store in the main location for example
#!/bin/bash
now=$(date +'%Y-%m-%d_%H-%M')
echo "Making backup folder for $now"
mkdir -p "/home/YOURUSER/backups/$now"

echo "Saving ghost Database Backup $now"
mysqldump --add-drop-table DATABASENAME --password='DBPASSWORD'| gzip > "/home/YOURUSER/backups/$now/db.sql.gz"

#Copying all important folders/files
rsync -avz --exclude 'logs' --exclude 'public' --exclude 'apps' /home/YOURUSER/public_html/content/ /home/YOURUSER/backups/$now/

echo "Compressing content folder"
zip -r "/home/YOURUSER/backups/$now/YOURSITENAME$now.zip" /home/YOURUSER/backups/$now > /dev/null

#Sending to the external storage
rclone copy /home/YOURUSER/backups/$now/YOURSITENAME$now.zip YOURRCLONENAME:PATHHERE

#Deleting old backups

rm -rf /home/YOURUSER/backups/*
If you are wondering why I'm using the option "--add-drop-table", it's just for convenience. This will make restoring your Ghost database easier in another server since it will delete automatically the necessary tables when we do the mysql import.
Now, what we need to do is to test the script. Choose a location to put it (I will chose the home of the root user).
After replacing everything that is important to replace, run the script to test if it is working:
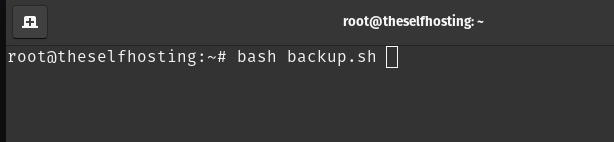
If youd did everything right, the backup will already be uploaded to your cloud. If some error appears, debug it manually before proceeding. Feel free to comment if you had any issues and I will try to hlep.
Creating the cron job
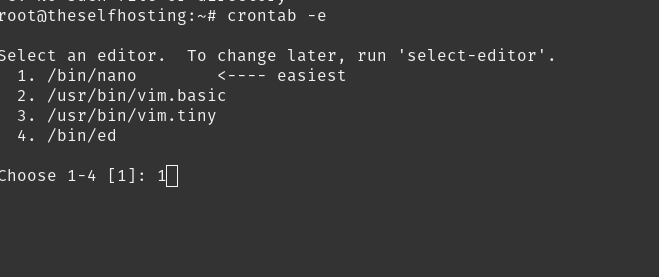
Now, to actually make this automatic, we just have to setup a Cron Job.
You can use:
crontab -eI'do highly recommend you to choose nano if you are not sure. If you understand vim/vi, well, you probably didn't even read this part of the guide.
Inside the Cron job, you can define how often you want it to run and which command should run.
You can use this site to get the frequency easier:
In my case, I will backup everyday, at 1 AM. We will also need to use bash to run the script, so you can call it using bash or the full path (/usr/bin/bash). My final cron looks like this:
0 1 * * * /usr/bin/bash /root/backuptheselfhostingart.sh

After saving the cron job and making sure that it works fine (run the command on cron manually to ensure) you will have automatic daily backups for your Ghost blog/site :)
Final result
This backup will be created everyday. It contains the zip with all the content that you need to restore you Ghost on a VPS. Probably if you provide this to Ghost.org they can also move your site there easily.
Notice that it contains the data as well, so you can easily identify the day of the backup.

Credits
This post wouldn't not be possible without the help of this post:
 Kenton Vizdos
This guy helped me with this idea. I did some modifications to his original script, but the idea came from him.
If you enjoyed this article, you can share it your friends or subscribe to The Self Hosting Art to keep us motivated. Thank you for reading :)You can also help with Monero, Litecoin, Bitcoin or Nano: Monero:837X2SppmrrPkBbpsy9HQU1RFxKhsBcn6GdQv2wR5wGoiw8ctfh6Rt36xaszveZHysYA5KSDBr51y5YuQ3YCV23sJS9nhqW BTC:bc1qrvgz7dzzlfllulakw87vzvtf7s2u8t0sxpjehr Litecoin:ltc1qycz6ssg6xjxttuld6l6ulzqdr3y70rm8wv2g9p Nano:nano_1jmd6dg4dbem7f3wrojr7g45ioe6eb5et3iq11f8urfxe8qausxipup8bhua


