Introduction
Hi! Today I will show you how to setup the fastest NextCloud stack ever. We will be using the fastest PHP (LSPHP), the fastest web server (OpenLiteSpeed) and the fastest settings (Redis with APCU).
What about security?
Of course, security is also extremely important, so on this setup we absolutely won't use the root user and both webserver and lsphp will run on the behalf of our user. So even if the site gets hacked somehow, your server will still be safe. We will also use some important security headers to make it harder to hack us.
Getting Started
The first thing we wanna do is to secure our VPS. You can check my guide on how to make your VPS safe HERE. After this step, we can go to the installation of the packages.
You can just copy and paste these commands to get started:
#Fully upgrading the OS
apt update
apt upgrade
#Installing the openlitespeed repo
wget -O - https://repo.litespeed.sh | bash
#Installing curl and GPG
apt install curl gpg
#Optional, but I highly recommend installing those imagick, ffmpeg and the depency to load any kind of image and generate previews :)
apt install imagemagick libmagickcore-6.q16-6
# Obs if you are using Ubuntu 22.04, the package name is ffmpeglibmagickcore-6.q16-6-extra instead.
#Installing Redis
curl -fsSL https://packages.redis.io/gpg | gpg --dearmor -o /usr/share/keyrings/redis-archive-keyring.gpg
echo "deb [signed-by=/usr/share/keyrings/redis-archive-keyring.gpg] https://packages.redis.io/deb $(lsb_release -cs) main" | tee /etc/apt/sources.list.d/redis.list
apt update
#Installing everything else
apt install redis-server openlitespeed lsphp81* zip unzip
#Making redis auto start on boot
systemctl enable redis-server
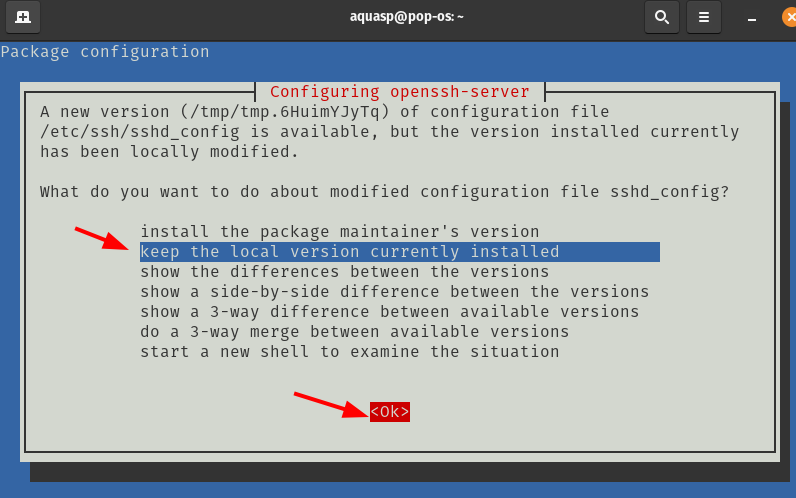
systemctl restart redis-serverObs: If you get this warning while updating, choose the default option and type "ok":
Now we have LsPHP81, OpenLiteSpeed and Redis 7
Creating a user and downloading NextCloud inside the user
Next thing is to create a user. Why? Security. We don't want nextcloud running as root.
I will use the name "files" but you can use any name.
adduser filesType a password and a name and hit enter until the end. After that, we will create the folder for our nextcloud. Go to the user and create the public_html inside the home folder:
su files #Changing to the files user
cd ~ #Going to home
mkdir public_html #Creating public_html
cd public_html #Entering public_html
Now we want to download the latest NextCloud Version. This step may take a while:
wget -c https://download.nextcloud.com/server/releases/latest.zip
unzip latest.zip #Unzipping
cd nextcloud #Entering on the nextcloud folder
rm .user.ini #Deleting this file. It's compatible only with apache.
rm .htaccess #Deleting this file. It's not fully compatible with OLS
mv * ../ #moving everything else to the previous folder
cd .. #Returning to the previous folder
rm -rf nextcloud #Deleting the NC folder.
rm latest.zip
Now we have everything good to go here :)
Using the web interface to setup OpenLiteSpeed
Now the funny part is coming. You need to go to OpenLiteSpeed gui. How? http://yourvpsIP:7080
Before doing so, make sure to setup a password for the web interface.
exit #To leave the files user
cd /usr/local/lsws/admin/misc #Go to the scripts folder for OLS
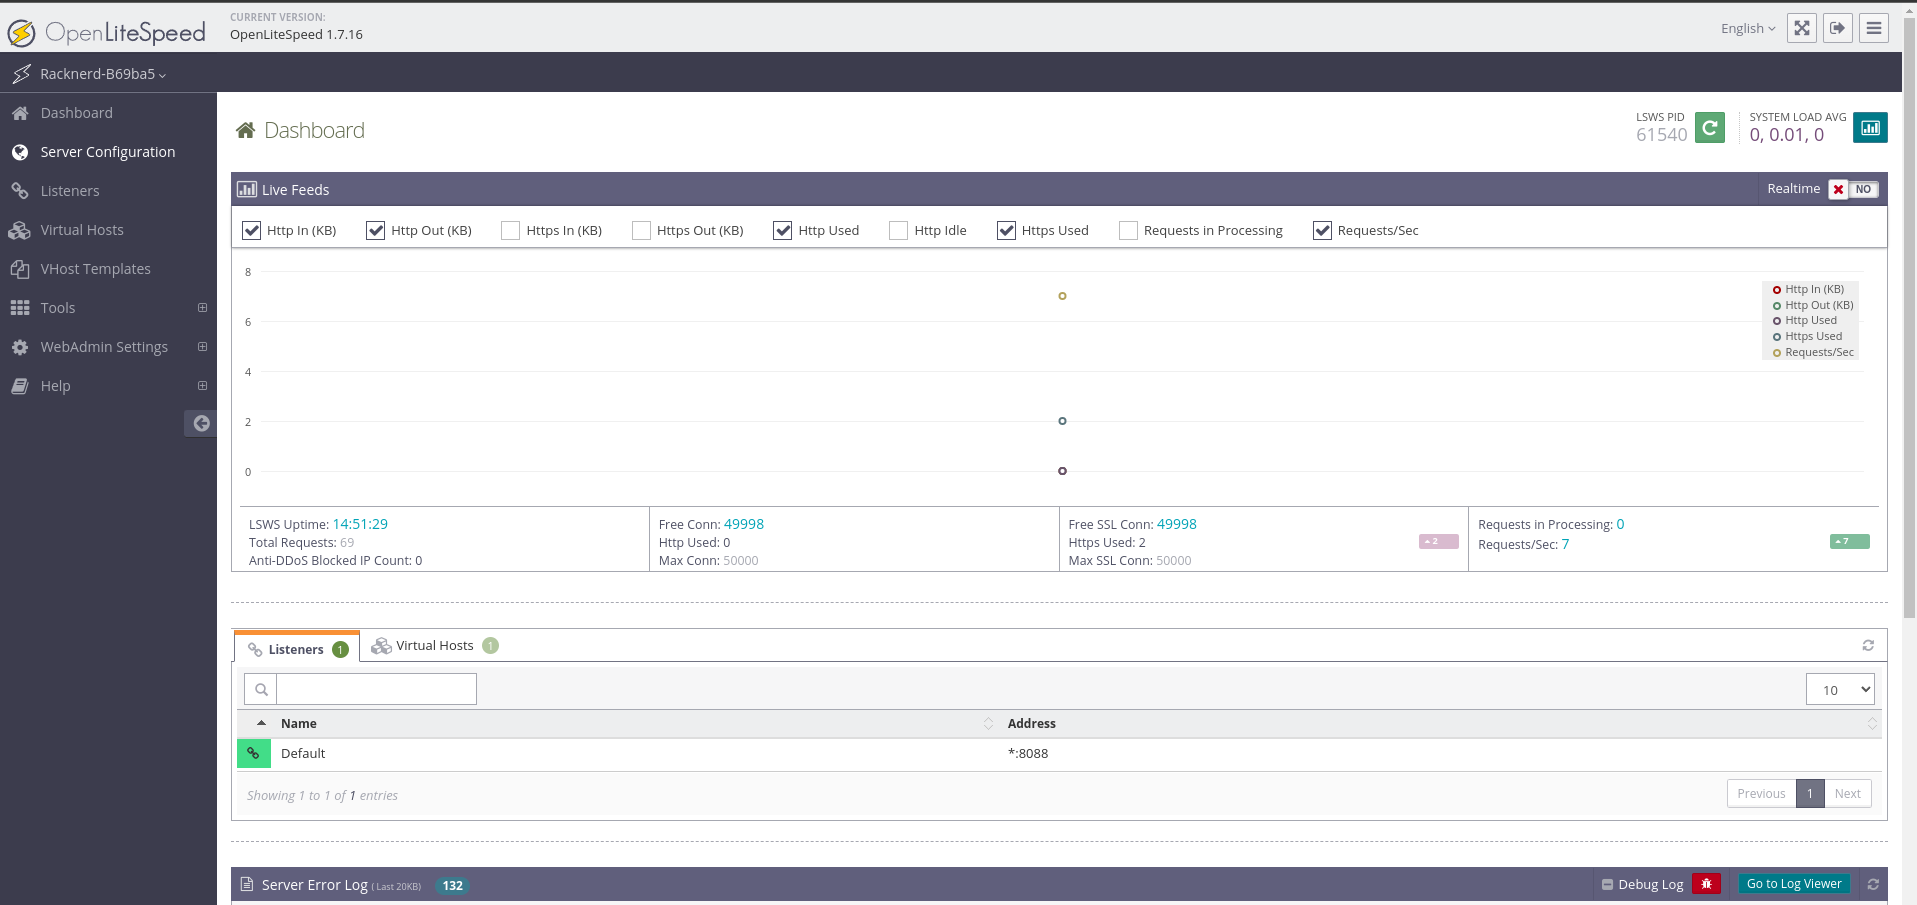
./admpass.sh #Change the password and user for your gui interfaceAnd here we go! Make sure to login now. You should be here:
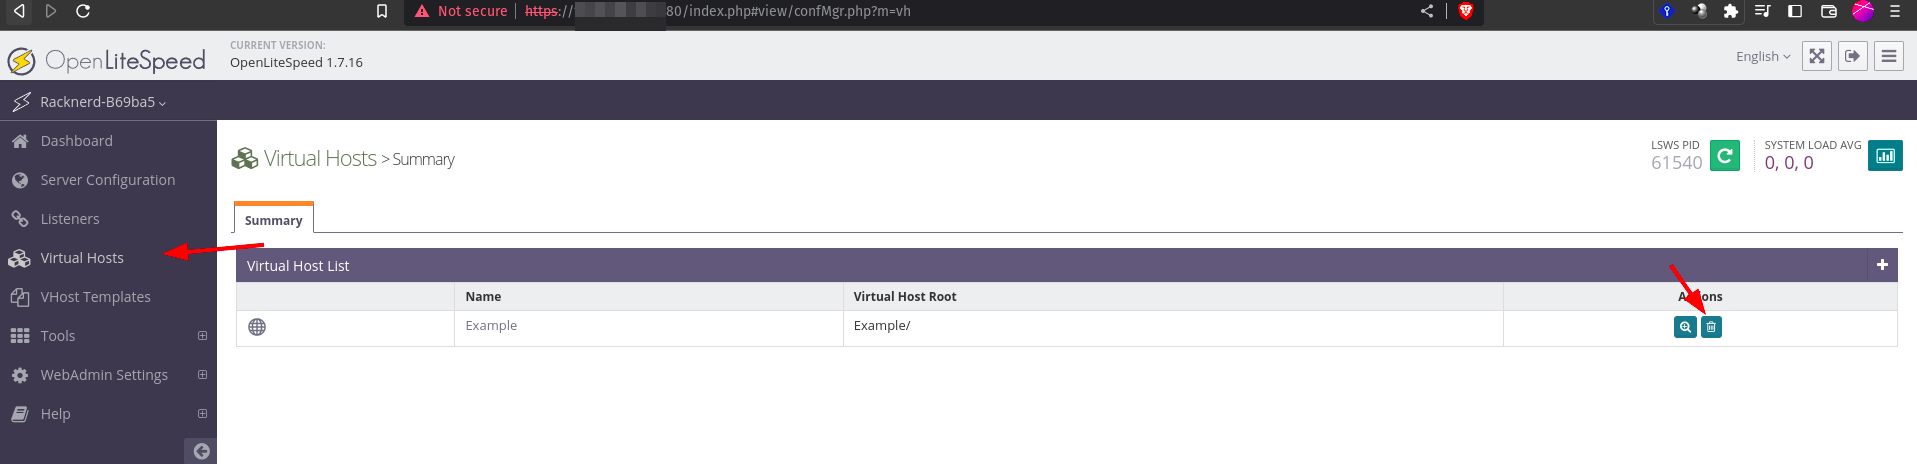
First thing you want to do is to delete the Example Virtual Host:
After that, you can create a new one(you can ignore the warnings to restart the browser). Put the data like this:
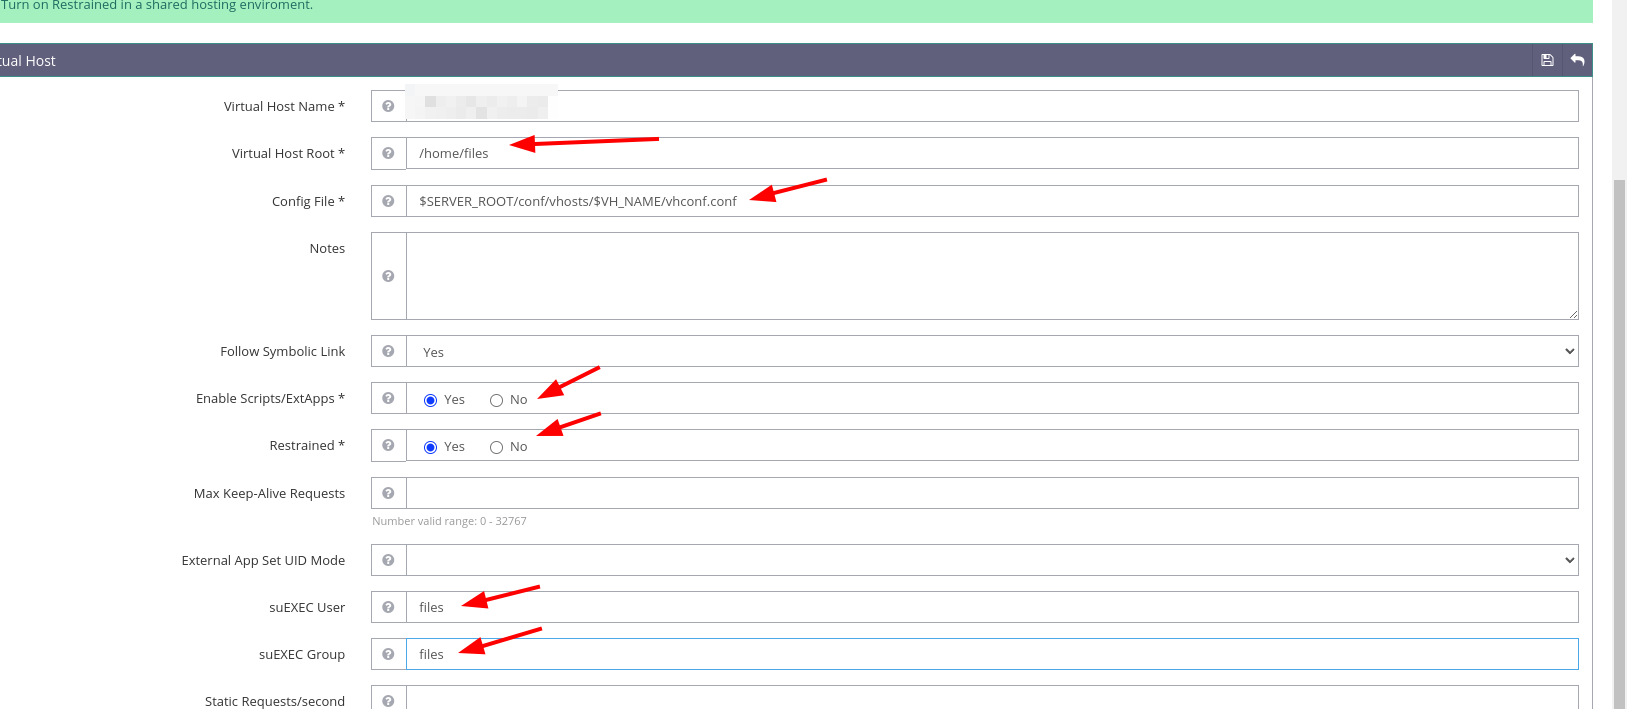
At "virtual host name" put your domain (e.g theselfhosting.art). At virtual host root, put /home/$youruser (in my case, files). Do not specify public_html yet.
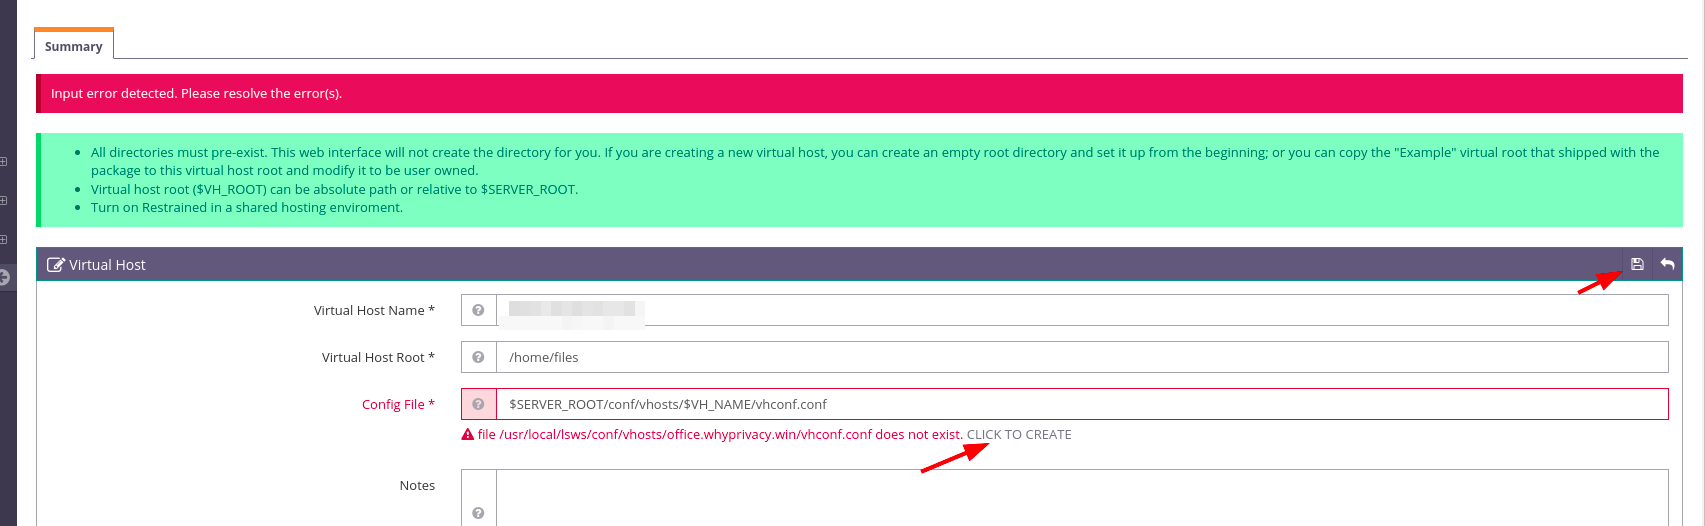
On config file, you can use exactly "$SERVER_ROOT/conf/vhosts/$VH_NAME/vhconf.conf"
Click on "save" and then let OpenLiteSpeed create the config file for you:
Now edit the virtual host again:
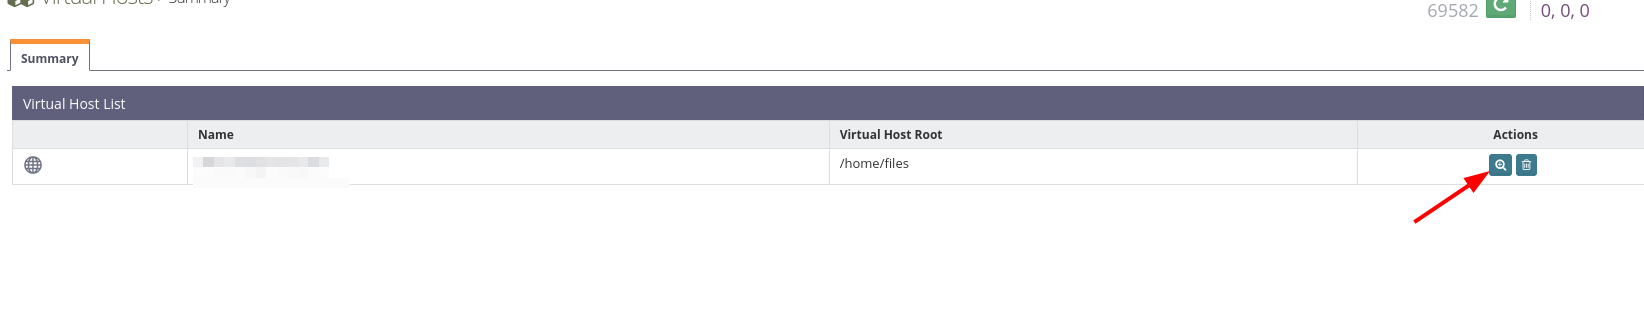
Use the following settings:
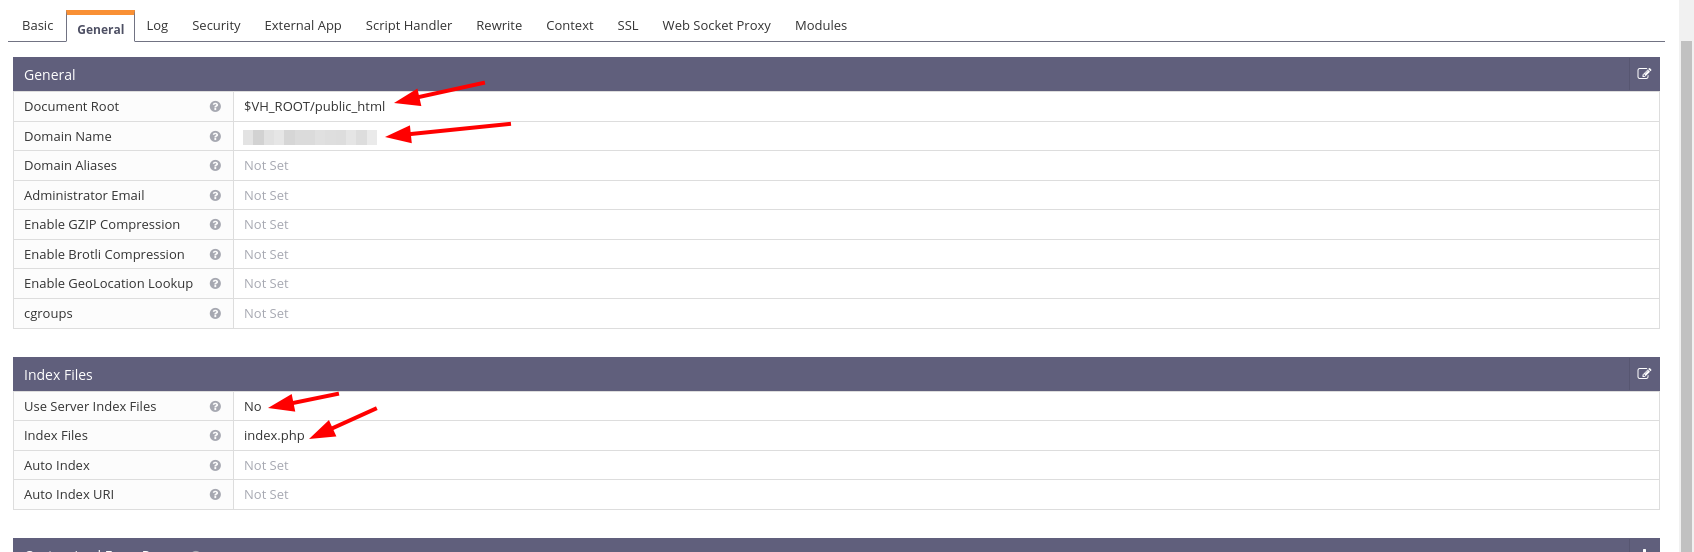
Domain name is your domain. For document root, you can use $VH_ROOT/public_html/public_html.
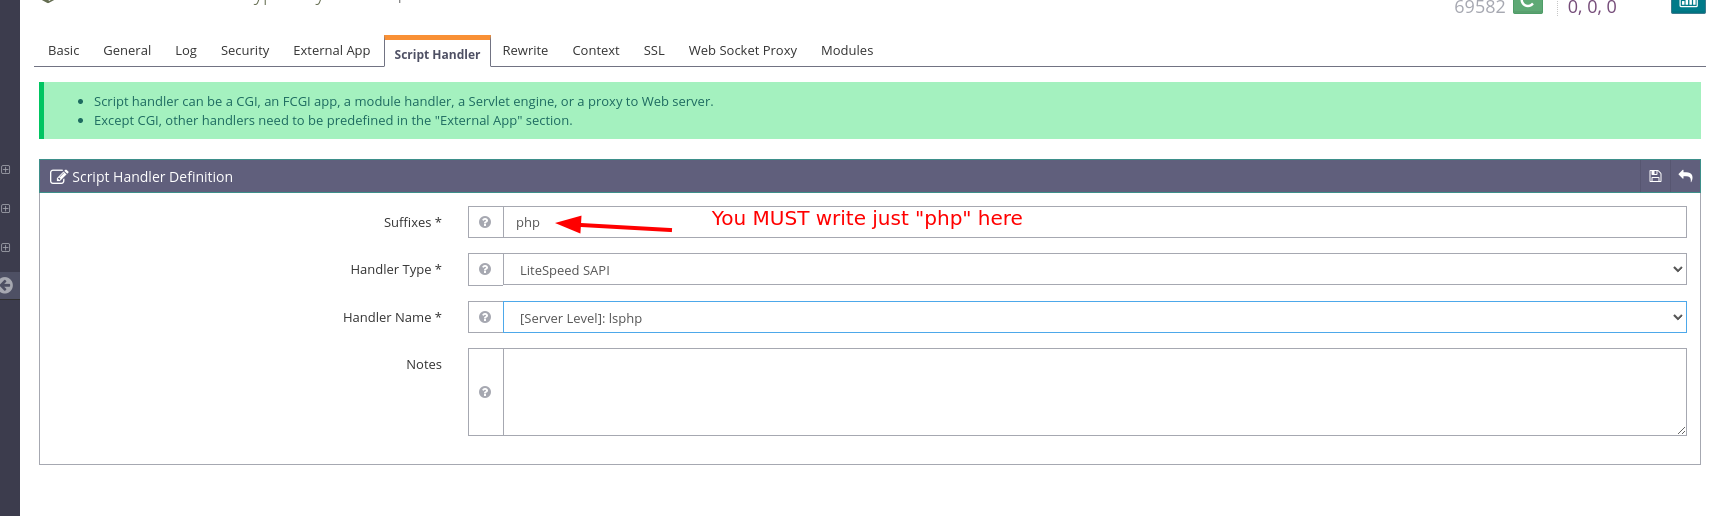
Next thing you wanna do is to setup your script handler. In our case, it will be LSPHP81:

Next, on the Rewrite tab use the following to force SSL:
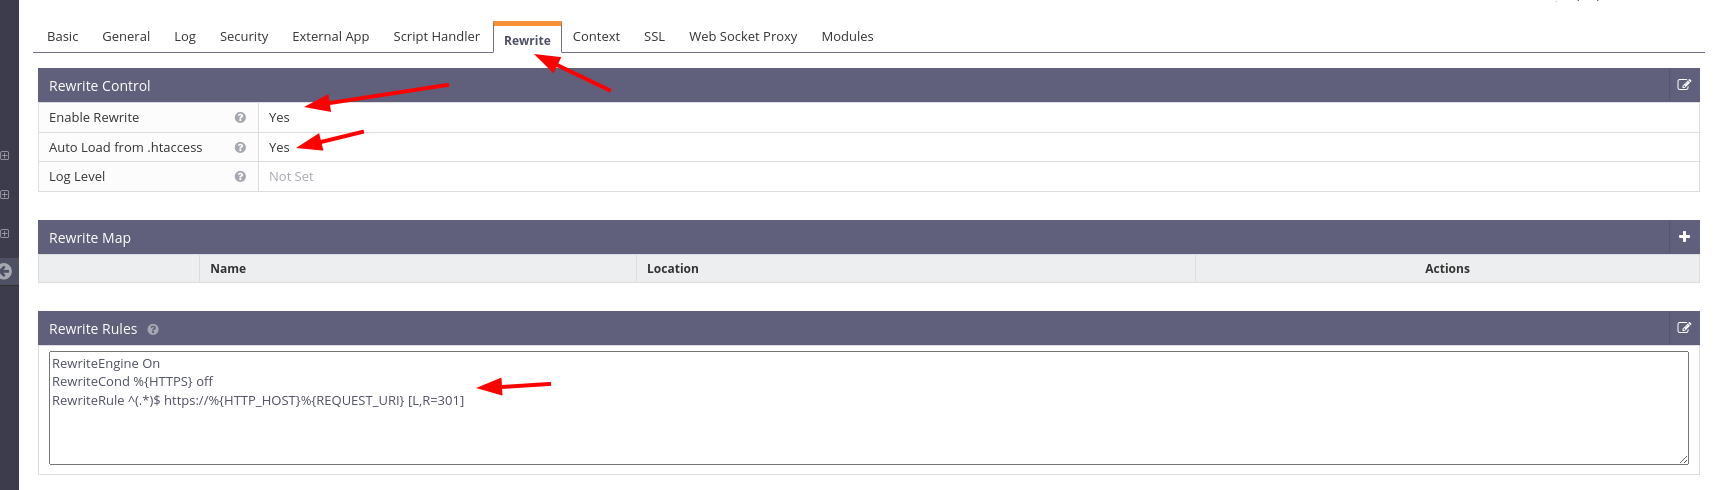
RewriteEngine On
RewriteCond %{HTTPS} off
RewriteRule ^(.*)$ https://%{HTTP_HOST}%{REQUEST_URI} [L,R=301]
Now, to add a bit more security, we can add some headers to upgrade insecure requests and HSTS to stop man in the middle attacks. Go to Context and create a new Static.


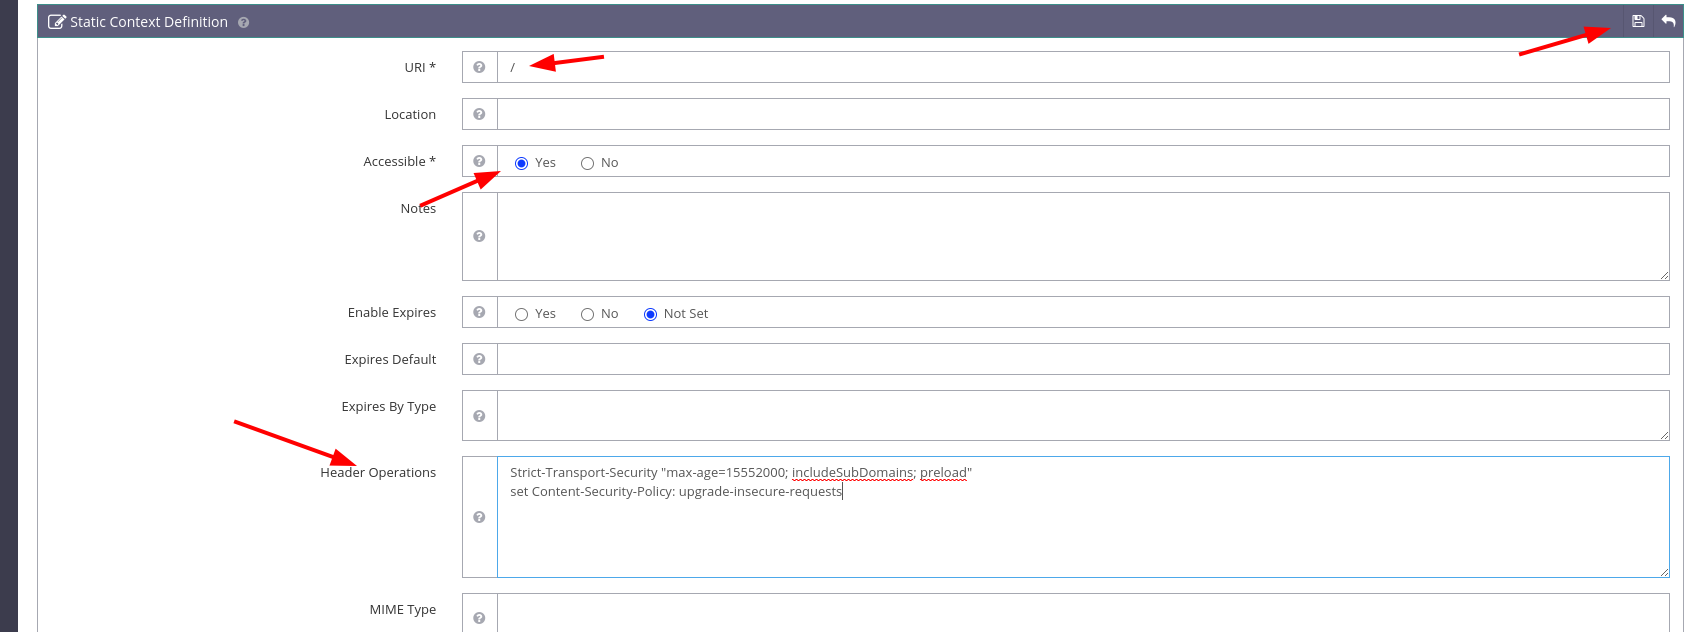
Setup the following:

Strict-Transport-Security "max-age=15552000; includeSubDomains; preload"
set Content-Security-Policy: upgrade-insecure-requests
Now you can finally do a graeful restart. Next thing we need is to add the listeners and setup LSPHP with the best settings.
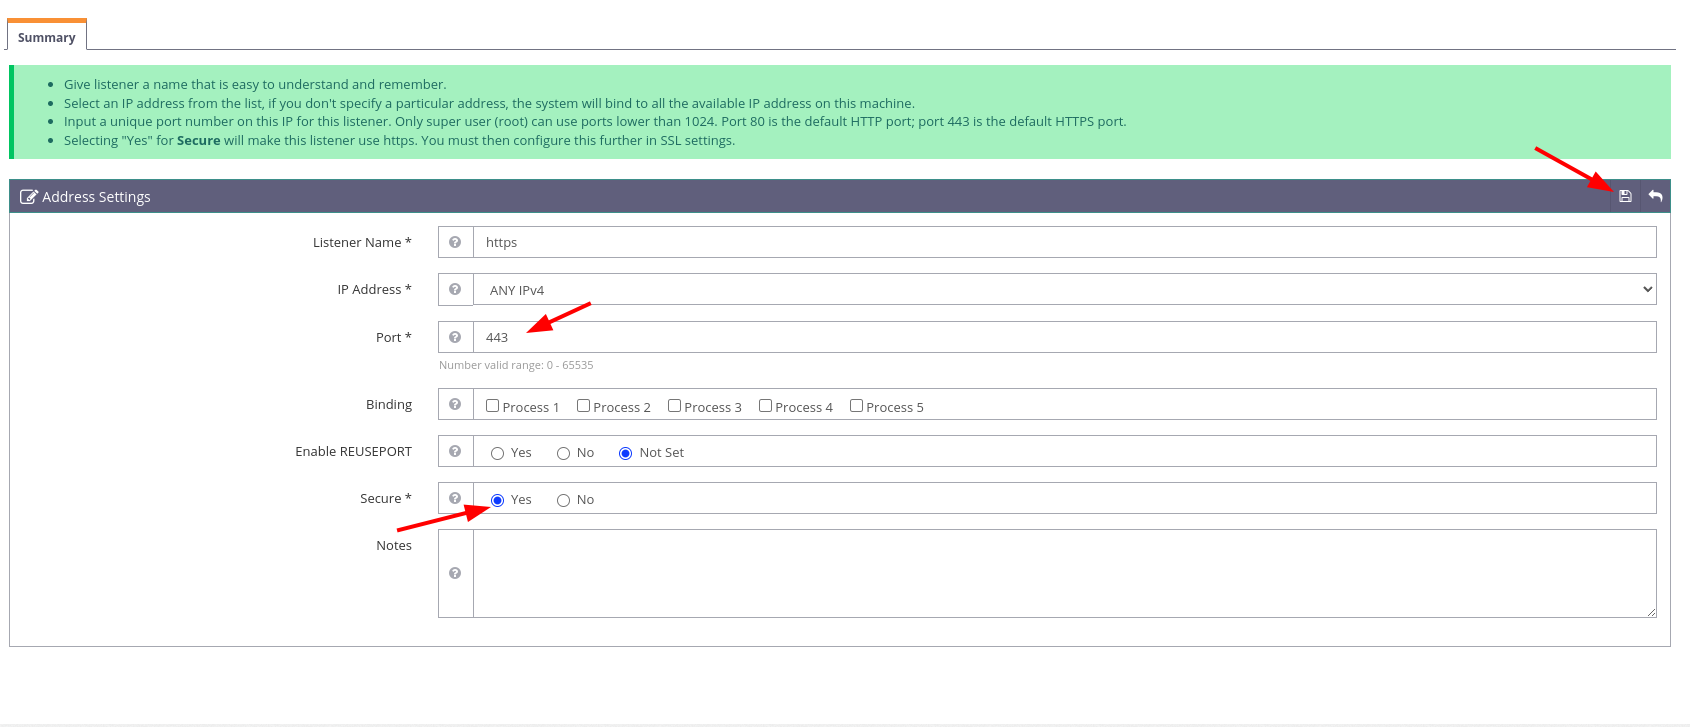
At Listeners, you need to create one for https and other for http:
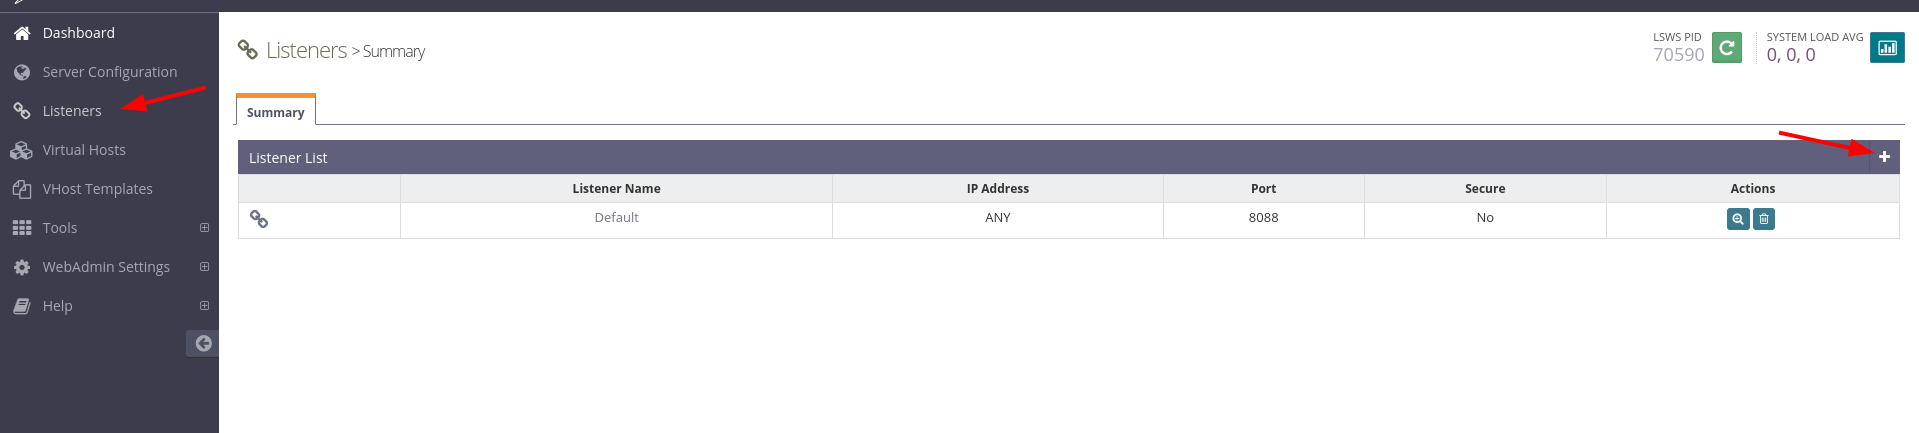
The HTTPS one must listen por 443 and be marked as secure:
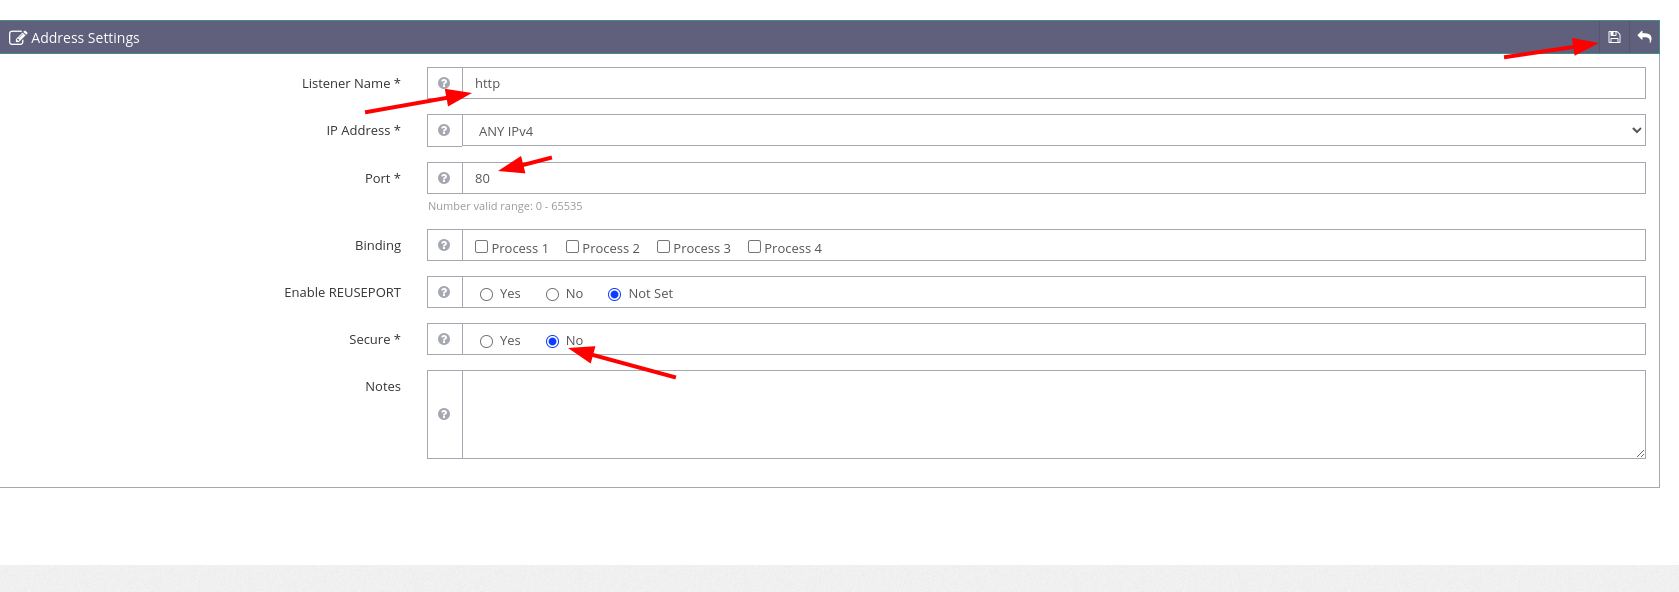
The HTTP one must listen port 80 and be marked as non secure:
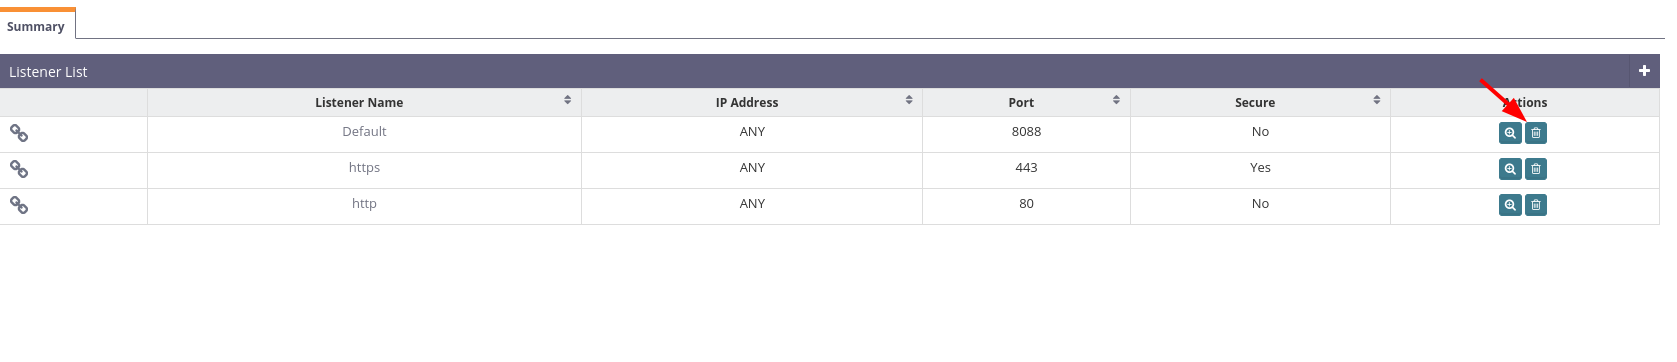
Feel free to delete the default listener as well:
Now, make sure to ADD YOUR VIRTUAL HOST FOR BOTH LISTENERS.
For example, I will add it to https:


Select your domain, and type it again below:
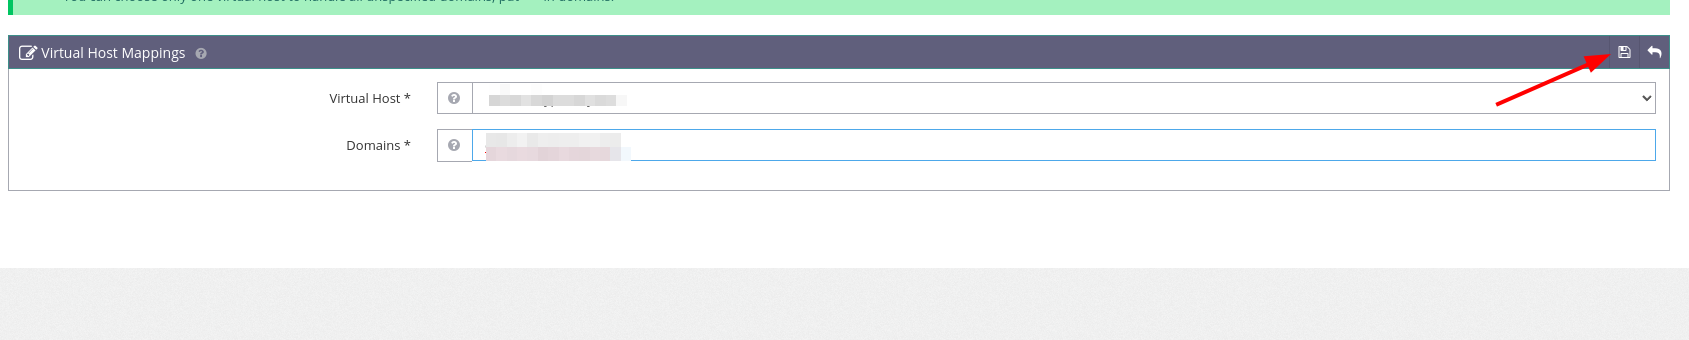
Make sure to type it correctly.
Now you must do the same to the other listener. Otherwise, you will have problems to issue the SSL.
Now, let's optimize LSPHP. To do so, go to Sever configuration -> External APP:

Change the following:

PHP_LSAPI_CHILDREN=100
LSAPI_AVOID_FORK=0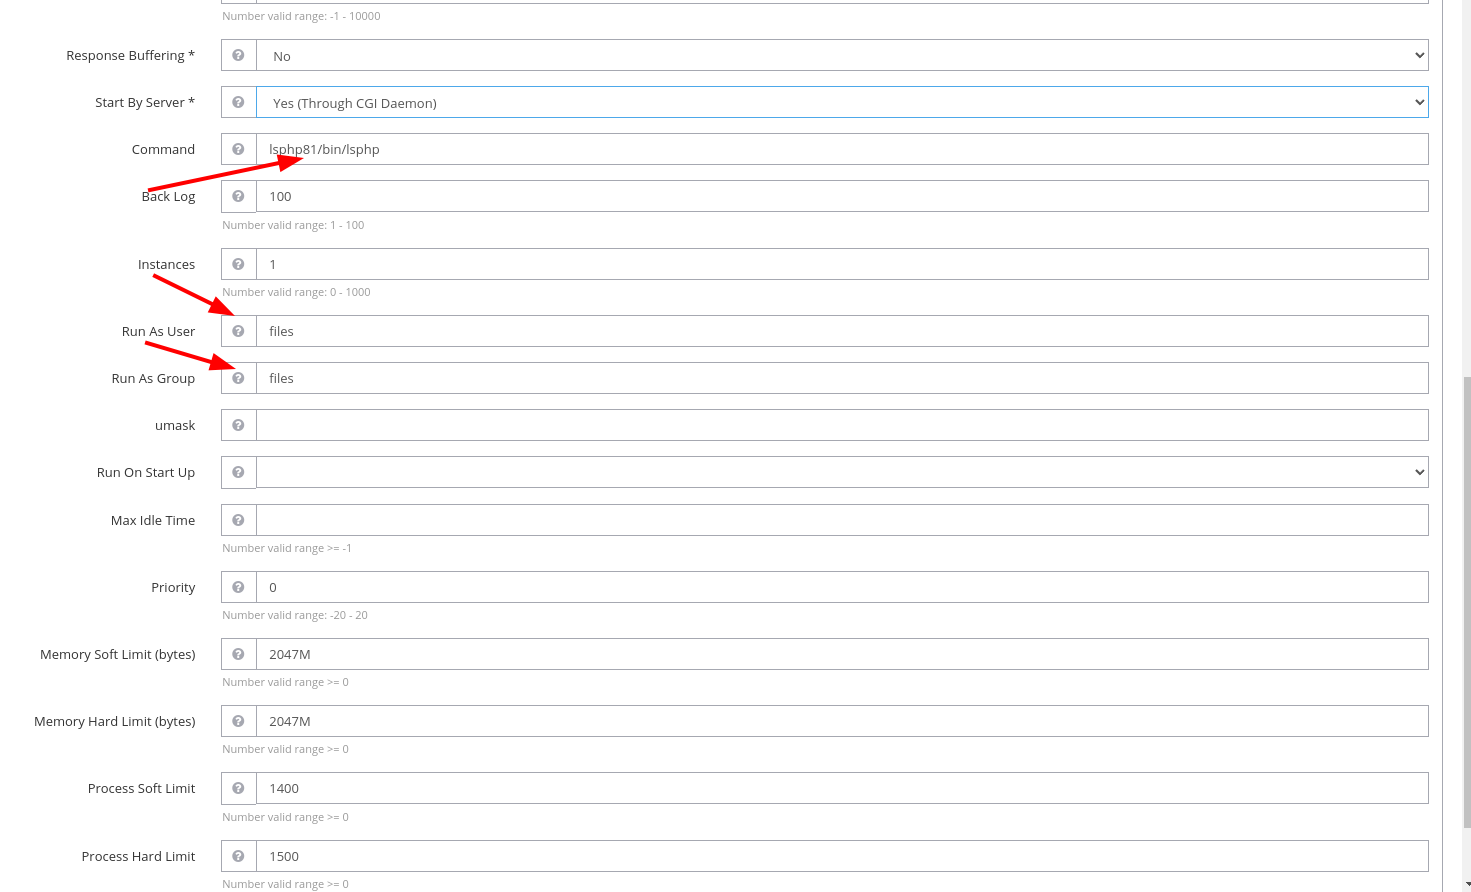
You must change 74 to 81 inside "command" and also make sure to put your user inside "run as user" and "run as group". That will make your NextCloud safer :)
Save changes now:

Issuing the SSL on the terminal
Now we are close to have a working NextCloud setup. What you want to do now is to create the SSL. To do so, we will want to install certbot. You need to run the below commands inside the root user.
apt install python3-certbotNow, to issue the SSL, do the following:
certbot certonlyChoose the option "2" (Place files in webroot directory (webroot)
Type your email, accept the terms with Y and I would recommend typing Y to help the EFF foundation, they are great guys. But feel free to type N if you don't want.
Once your account is registered, they will ask the domain. Input your domain and then they will ask the webroot. The webroot is basically the place where our webserver(OpenLiteSpeed) is reading the files.
In my case it is: /home/files/public_html
If you used a different user, just replace "files" with your user.
If you did everything correctly, you should see this:
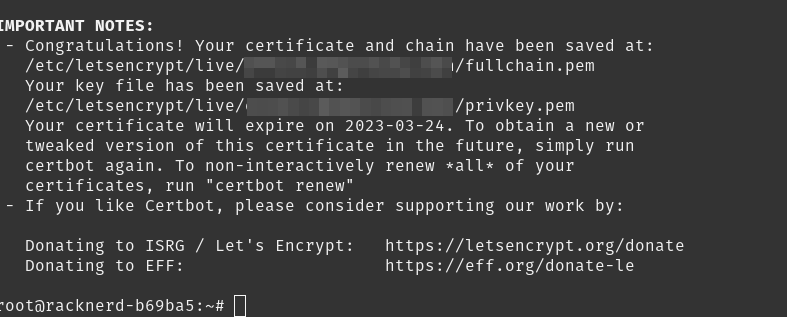
Copy the path of the SSL, it will be important. It will be something like
/etc/letsencrypt/live/yourdomain.com/fullchain.pemAuto renew for SSL
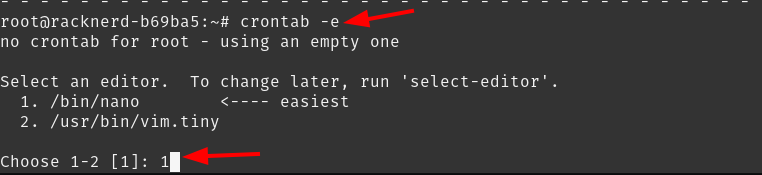
This is really easy and important. Certbot provides us a EASY way to renew SSL. To do so, we can just run certbot renew. But we don't want to do it manually. Our SSL is good to go for 3 months. To make it renew automatically, we can just setup a cron job.
crontab -eI recommend choosing nano:
Type the following:
0 0 * * 0 certbot renew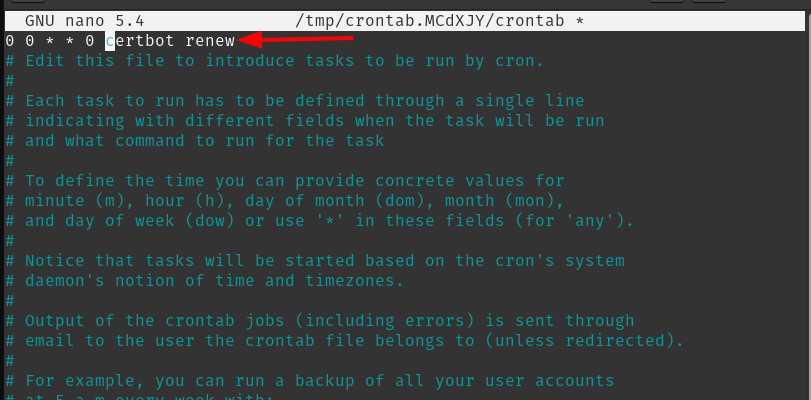
Then use ctrl + O and ctrl +X to save the file. What we just did is: We created a cron job to run this command weekly. So when the SSL is close to the expiration date, certbot will renew it automatically. If it is good to go, it won't be renewed :)
Using your SSL at OpenLiteSpeed
To use your SSL certificate on OpenLiteSpeed, you need to put it on the virtual host and on the listener. It's quite easy, just follow my lead:
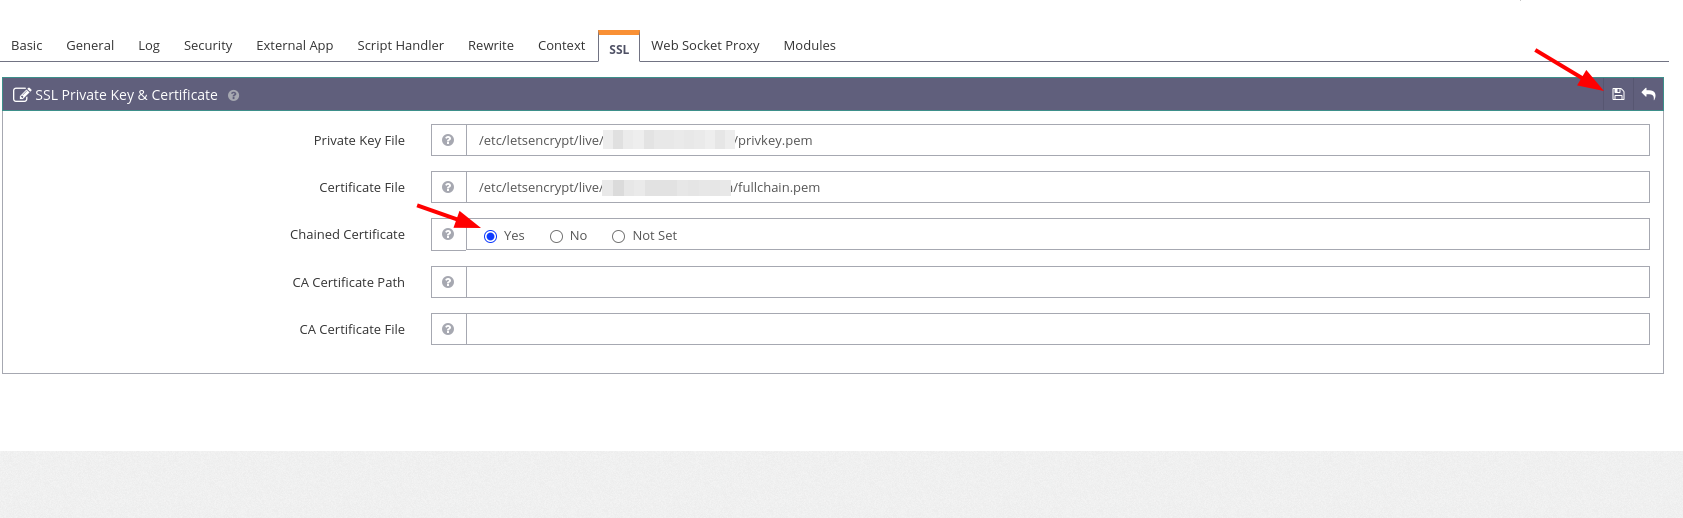
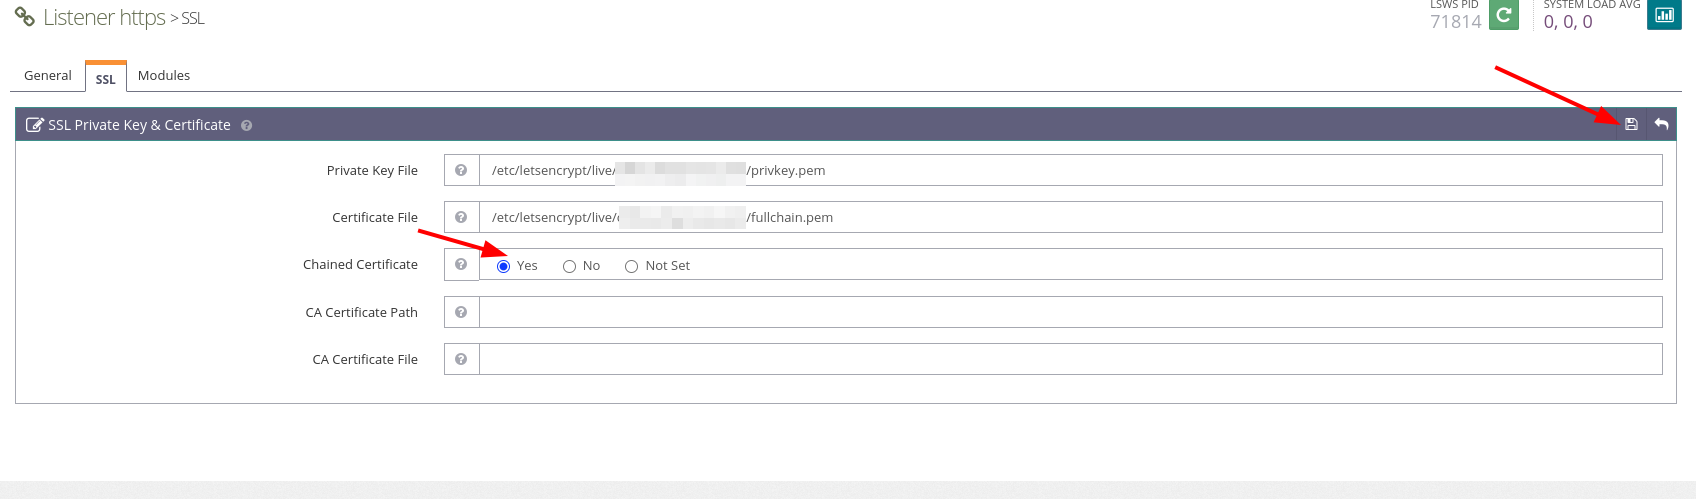
Virtual Hosts -> Your Virtual Host -> SSL
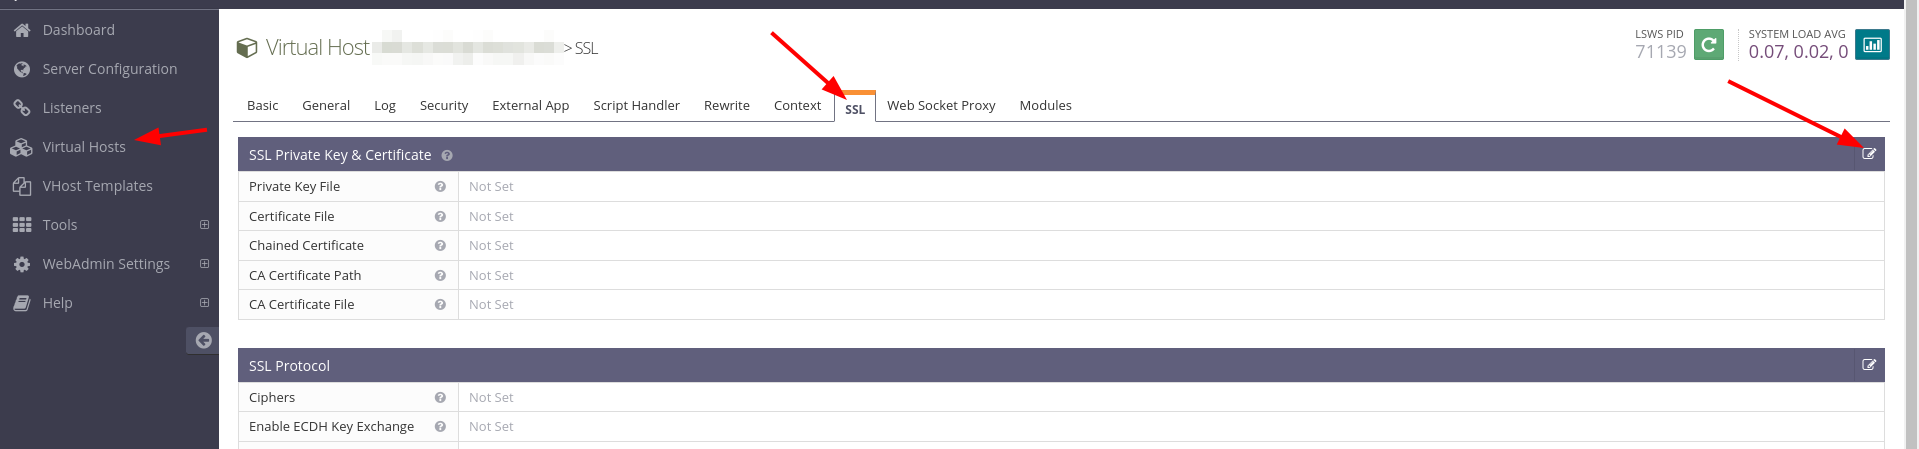
On the private key, put the path that ends with privkey.pem and on the certificate file, put the fullchain.pem. Also make sure to marked "Chained certificate" as yes:
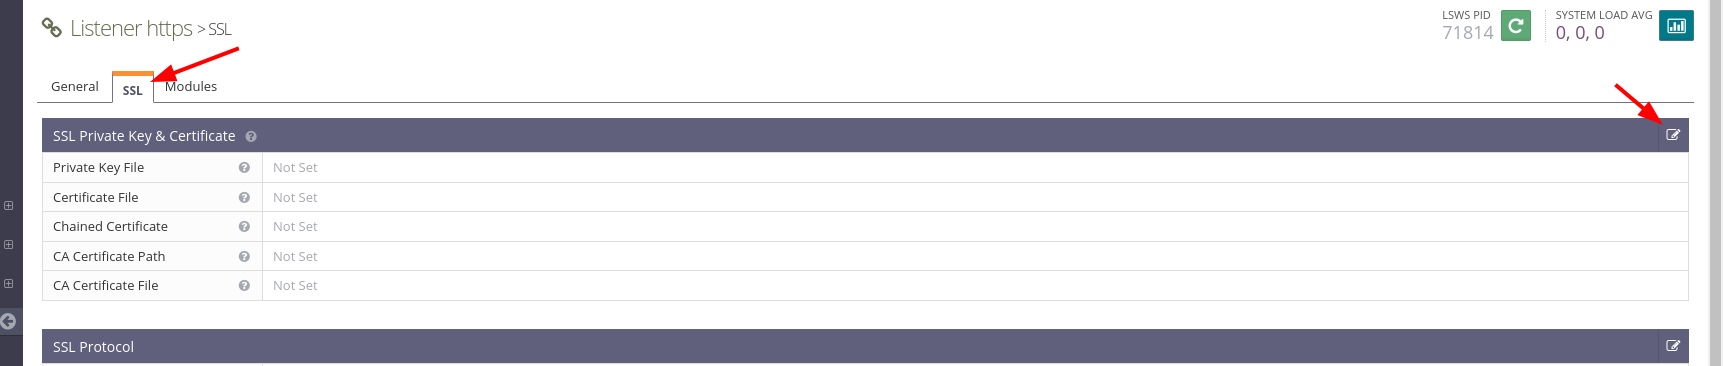
Now go to Listeners and edit the https one:
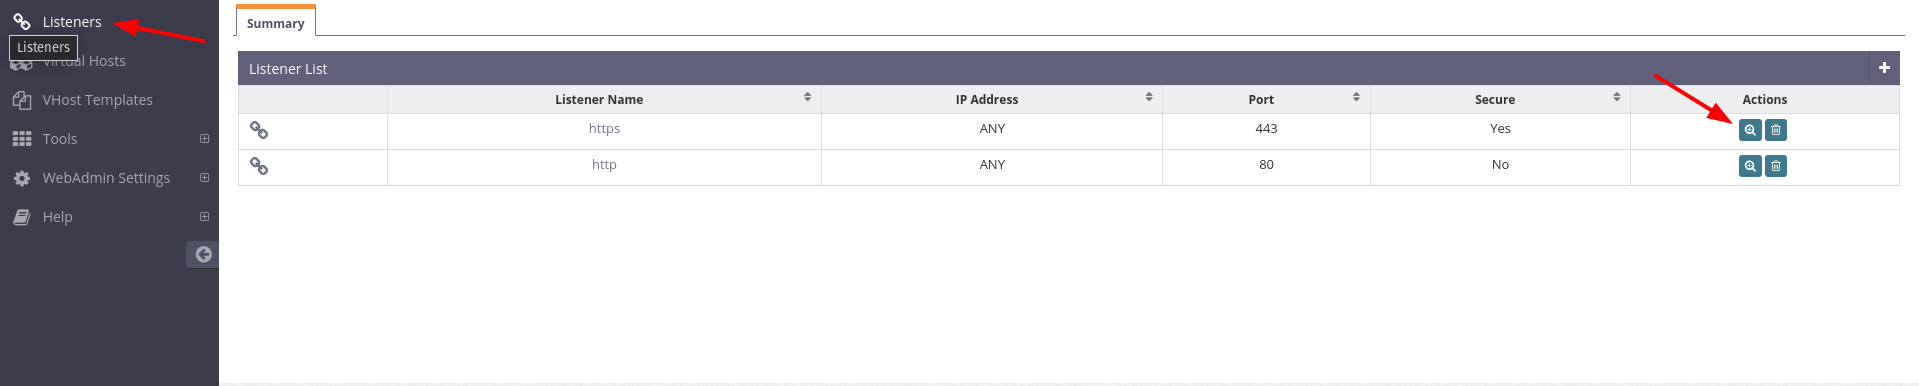
Do the same process on the SSL tab here:
Now your domain should already be accessible, but hold on. We still need to setup MySql :)
Creating a secure MySQL database
We can use either MariaDB or Mysql. In this guide, I will be using MySQL. I'm more familiar with it and it works really well with NextCloud. The community edition is GPL based so don't worry :)
wget -c https://dev.mysql.com/get/mysql-apt-config_0.8.24-1_all.deb --inet4

dpkg -i mysql-apt-config_0.8.24-1_all.deb
On this screen, select ok and ok:

You can use the bottom arrow to scroll down to the first ok and then use tab to select the second ok.
After this is done, you can delete the deb
rm mysql-apt-config_0.8.24-1_all.deb
apt update
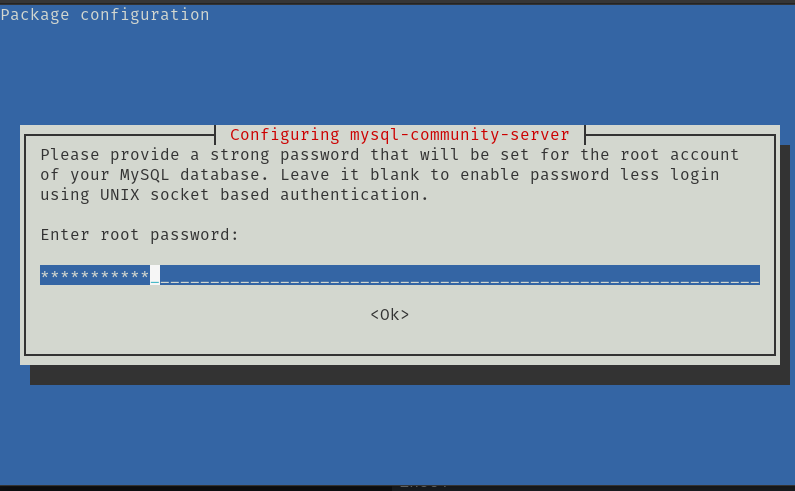
apt install mysql-server
On the settings, make sure to choose a password here (and make sure to remember it):
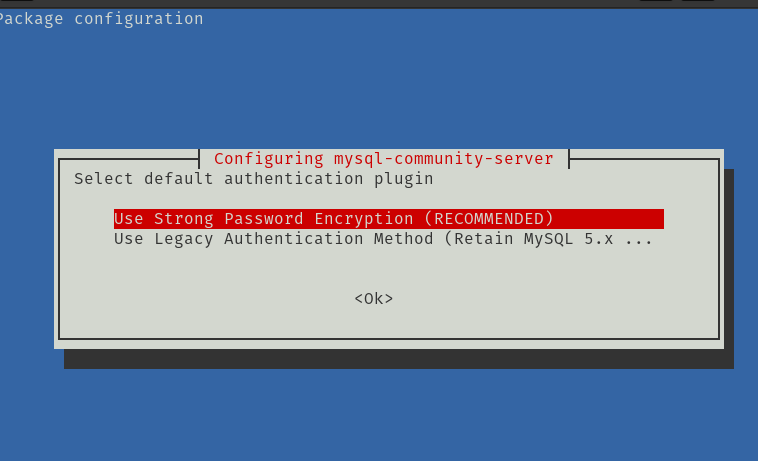
Confirm the password and then hit enter to use a strong password encryption:
To verify that your installation is good to go, check the mysql version:
root@racknerd-b69ba5:~# mysql --version
mysql  Ver 8.0.31 for Linux on x86_64 (MySQL Community Server - GPL)
root@racknerd-b69ba5:~#
Now, we need to make our installation secure:
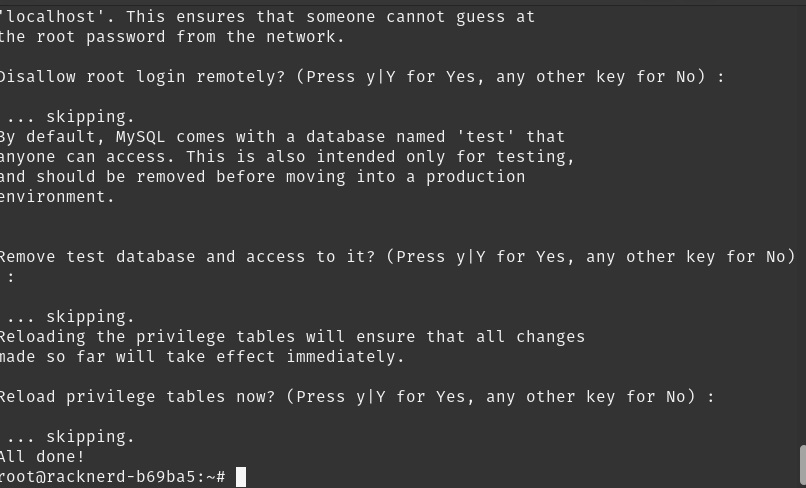
mysql_secure_installationYou will need to enter your password for root. For the first question about VALIDATE PASSWORD COMPONENT, type No. Same thing for the question asking if you want to change root password. After tthose two questions, just hit enter for everything else:
N
N
Y
Y
Y
Y
You should see something like this:
Now let's enter on mysql and create our nextcloud user and db:
mysql -pPut your password that you defined when installing MySQL.
Once you are here:
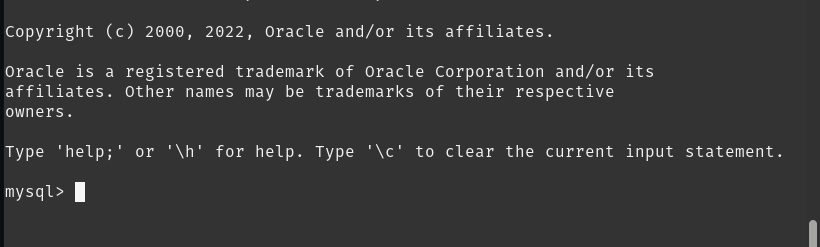
Use the following to create your DB and user:
CREATE DATABASE nextcloud;

CREATE USER 'nextclouduser'@'localhost' IDENTIFIED BY 'yourpasshere';

GRANT ALL ON nextcloud.* TO 'nextclouduser'@'localhost';

FLUSH PRIVILEGES;

EXIT;
Feel free to change nextclouduser and nextcloud to anything that you want. Also make sure to use a strong password for your DB.
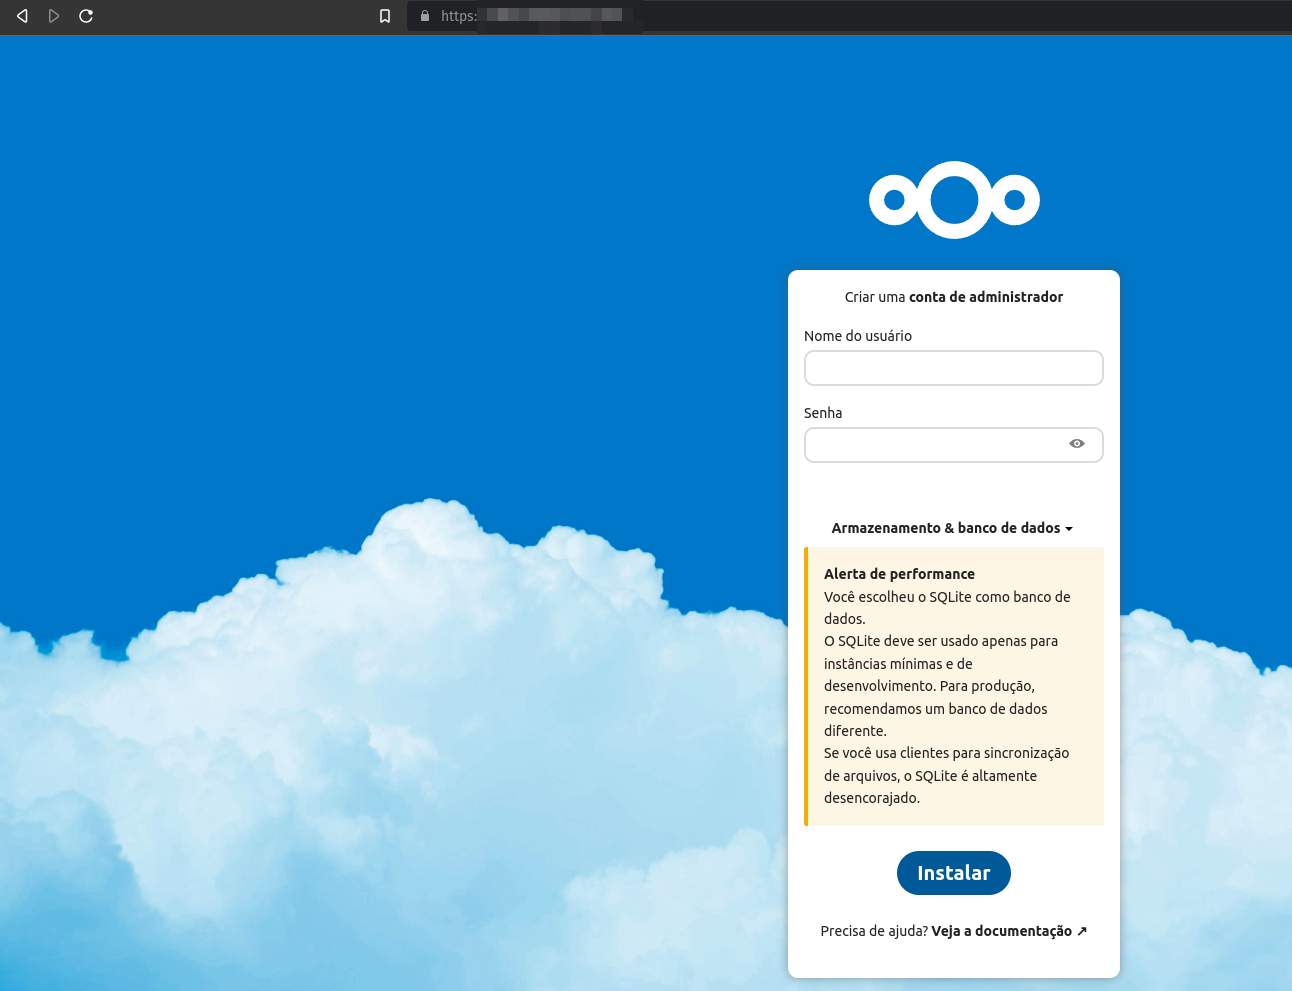
With this step done, we can go back to our domain and setup NextCloud:

The most important thing here is: Change the localization of the data. DO NOT LET DATA folder inside public_html. That is not safe at all, specially with NextCloud since our .htaccess won't work to protect this folder.
Make sure to put data on /home/files/data or any other folder, but please, do not put it inside public_html. Doing so will expose your files to the web. Other than that, just put your desired user for nextcloud, password and also the data for your MySQL database.
If for some reason you forgot your DB password, you can setup a new one after entering mysql as root again:
mysql -p
SET PASSWORD FOR 'YourNextCloudUser'@'localhost' = 'yournewpass';
NextCloud will now ask if you want to install the recommended apps:
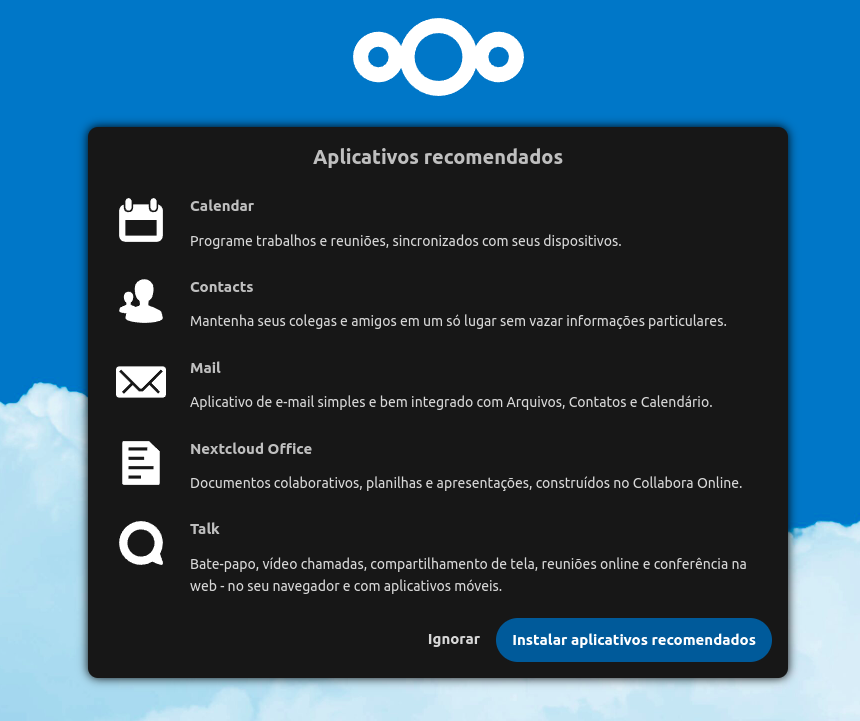
You can say yes. After everything is installed, DON'T USE nextcloud yet.
It's not optimized and will be not fast enough. Please ignore the urge to use it right now.
Optimizing php.ini and Redis
This part may be really boring but I got your back! You can just copy and paste those commands and they will replace the parameters automatically on php.ini and redis.
To optimize php.ini, do the following:
sed -i 's/memory_limit = 128M/memory_limit = 1024M/g' /usr/local/lsws/lsphp81/etc/php/8.1/litespeed/php.ini

sed -i 's/post_max_size = 8M/post_max_size = 10240M/g' /usr/local/lsws/lsphp81/etc/php/8.1/litespeed/php.ini

sed -i 's/upload_max_filesize = 2M/upload_max_filesize = 10240M/g' /usr/local/lsws/lsphp81/etc/php/8.1/litespeed/php.ini

sed -i 's/max_file_uploads = 20/max_file_uploads = 1000/g' /usr/local/lsws/lsphp81/etc/php/8.1/litespeed/php.ini

sed -i 's/max_execution_time = 30/max_execution_time = 86400/g' /usr/local/lsws/lsphp81/etc/php/8.1/litespeed/php.ini

sed -i 's/max_input_time = 60/max_input_time = 86400/g' /usr/local/lsws/lsphp81/etc/php/8.1/litespeed/php.ini

sed -i 's/output_buffering = 4096/output_buffering = off/g' /usr/local/lsws/lsphp81/etc/php/8.1/litespeed/php.ini

sed -i 's/;opcache.enable=1/opcache.enable=1/g' /usr/local/lsws/lsphp81/etc/php/8.1/litespeed/php.ini

sed -i 's/;opcache.revalidate_freq=2/opcache.revalidate_freq=60/g' /usr/local/lsws/lsphp81/etc/php/8.1/litespeed/php.ini

sed -i 's/;opcache.save_comments=1/opcache.save_comments=1/g' /usr/local/lsws/lsphp81/etc/php/8.1/litespeed/php.ini

sed -i 's/;opcache.max_accelerated_files=10000/opcache.max_accelerated_files=20000/g' /usr/local/lsws/lsphp81/etc/php/8.1/litespeed/php.ini

sed -i 's/;opcache.memory_consumption=128/opcache.memory_consumption=512/g' /usr/local/lsws/lsphp81/etc/php/8.1/litespeed/php.ini

sed -i 's/;opcache.interned_strings_buffer=8/opcache.interned_strings_buffer=64/g' /usr/local/lsws/lsphp81/etc/php/8.1/litespeed/php.ini


pkill -f "lsphp"
systemctl restart lsws
After running all those commands, make sure to add this line manually on the file as well. You can add on any place, just ensure that it doesn't have a ; before
nano /usr/local/lsws/lsphp81/etc/php/8.1/litespeed/php.ini

#Add this lines:
apc.enable_cli = 1
Now php is good to go. We just need to set Redis. To do so:
sed -i 's/port 6379/port 0/g' /etc/redis/redis.conf

line_old='# unixsocket /run/redis.sock'

line_new='unixsocket /var/run/redis/redis-server.sock'

sed -i "s%$line_old%$line_new%g" /etc/redis/redis.conf

sed -i 's/# unixsocketperm 700/unixsocketperm 770/g' /etc/redis/redis.conf

sed -i 's/# maxmemory <bytes>/maxmemory 1024mb/g' /etc/redis/redis.conf

systemctl restart redis-server
Optimizing NextCloud
We are close to the end! Now, enter on the user files and setup this cron job:
su files
crontab -e

#Use this one
*/5  *  *  *  * /usr/local/lsws/lsphp81/bin/php -f /home/files/public_html/cron.php
Should look like this:

Now, go to public_html and edit config/config.php. We are going to use redis :)
Be careful on this part and open the terminal in full screen before copy and pasting the command. The spacing must be perfect on NextCloud will return error 500.
cd /home/files/public_html

nano config/config.php
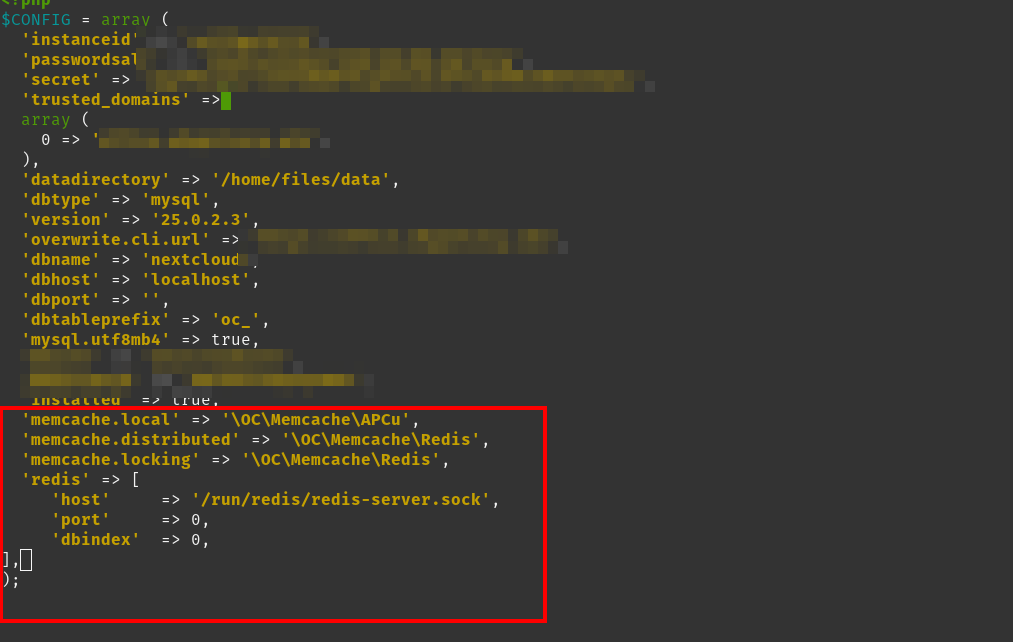
On config.php, add the following below 'installed' => true,
  'memcache.local' => '\OC\Memcache\APCu',
  'memcache.distributed' => '\OC\Memcache\Redis',
  'memcache.locking' => '\OC\Memcache\Redis',
  'redis' => [
     'host'     => '/run/redis/redis-server.sock',
     'port'     => 0,
     'dbindex'  => 0,
],
Remember, the spacing must be perfect. It should look like this:
Now, go back to the root user and kill the php processes
exit
usermod -a -G redis files #Adding the redis to the files user
pkill -f "lsphp"
systemctl restart lsws
systemctl restart redis-server
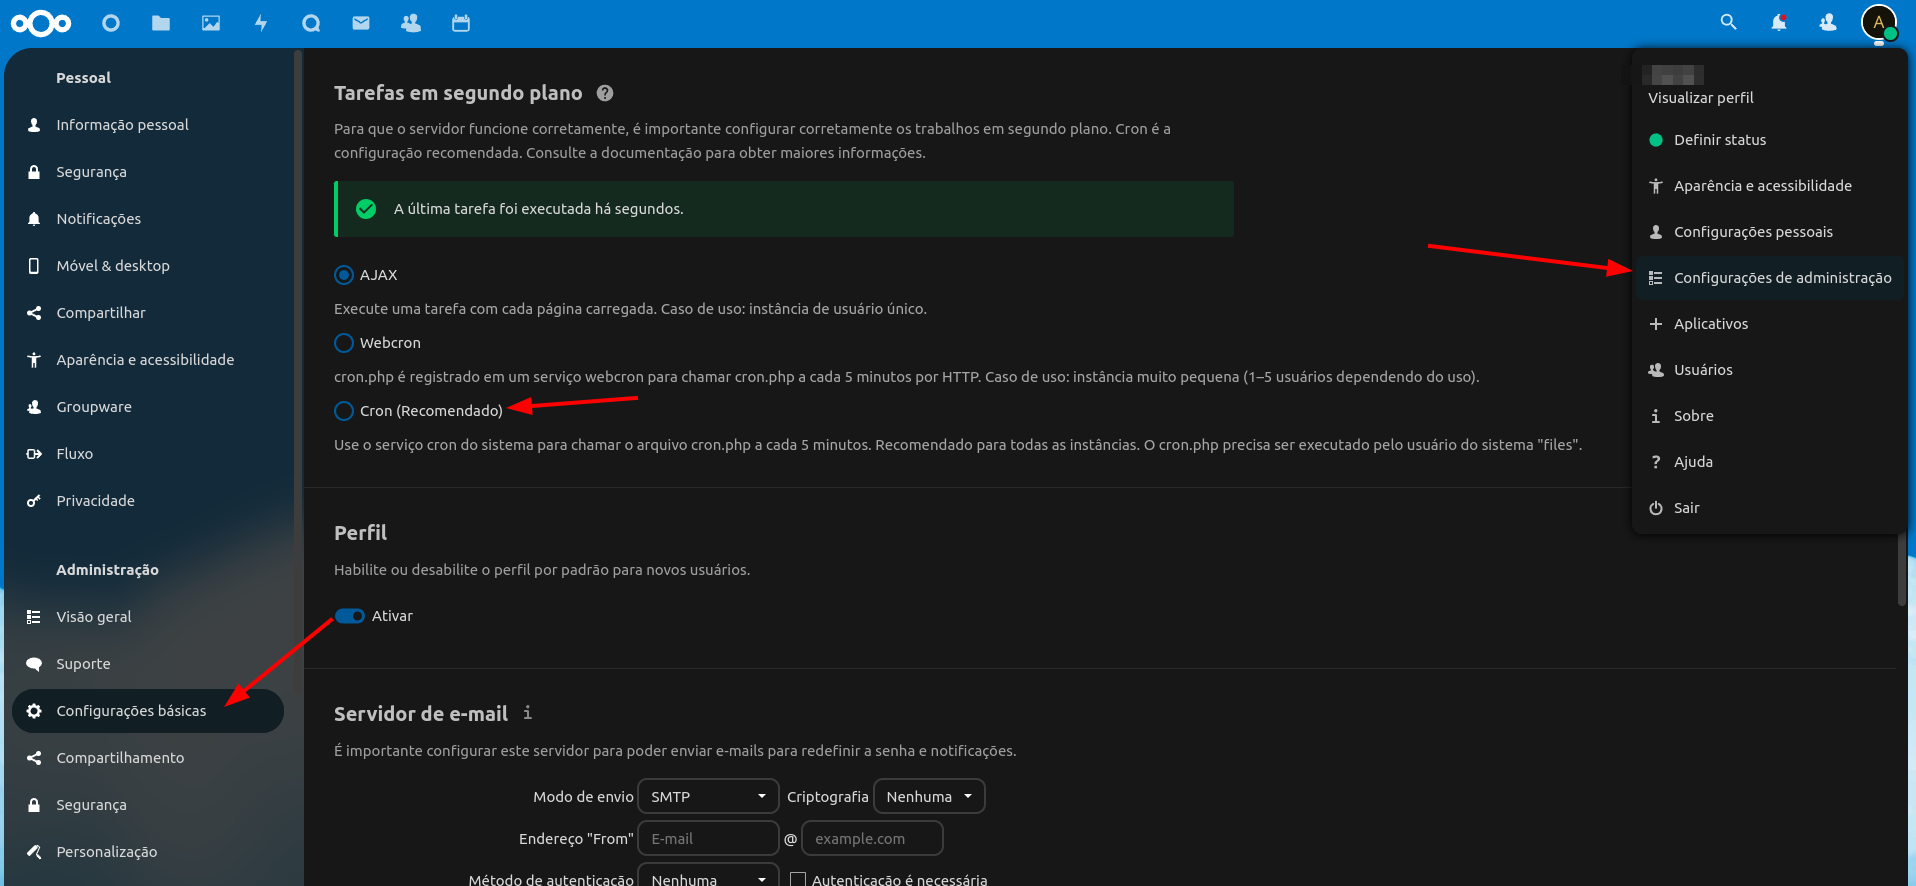
systemctl enable redis-serverNow, inside the NextCloud Interface, start using the cron job that we created in the past:
Administration settings -> Basic Settings - Cron (Recommended)
Last thing we want to do is verify is Redis is working. To do so, enter on the files user and run this command:
su files
redis-cli -s /var/run/redis/redis-server.sock MONITOR
You should see an "OK":

Try to navigate on NextCloud panel and see if something else appears:
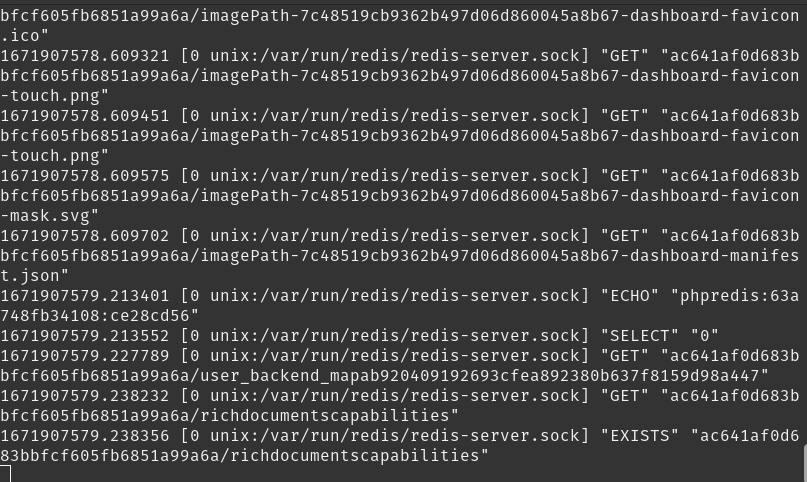
If a lot of stuff appearead, redis is working perfectly.
Finishing and making it easy to mantain the server for the long run
One thing that NextCloud does well is supporting CLI. You can do a LOT just using the "occ" comand.
To make the usage comfortable, we should add the php path to the system. To do so, enter on the files user and add this line on the .bashrc file
su files #to enter on the files user

nano ~/.bashrc #To edit the bashrc file of the files user

# Add this to .bashrc in order to allow occ to be executed from anywhere
alias occ='/usr/local/lsws/lsphp81/bin/php occ'

#Loding the bashrc file right now
source ~/.bashrc
Now check this out, you can use ANY occ command directly at your public_html
cd ~/public_html/

occ upgrade
Check how cool is it:
files@racknerd-b69ba5:~/public_html$ occ upgrade
Nextcloud is already latest version
files@racknerd-b69ba5:~/public_html$
Well, that is the end :)
Congratulations, you now have a FAST, stable and secure NextCloud. If you failed on some step, feel free to drop a comment here and I will help as best as I can.
Thanks for reading, that is all!
If you enjoyed this article, you can share it with your friends or subscribe to The Self Hosting Art. Thank you for reading :)
You can also help with XMR(Monero):

8AWKRGyqQ6fdaLwGVAdVTbEP6ZttSXwcYWQWy7gnq6zceTngtJgaAr82Hxr2FY5bkCUJVerccH9XNFX1qWnZxuGYTU5bJ34